Tutorial for experiment creation on a computer
1. Experiment-scenes in LightWave Studio can be created with .emms-files. We have a draft file ready for you to use.
Download the file here.
We recommend that you try out a few of the experiment-scenes in the app before you start creating your own scenes, in order to get used to the scene format and its various elements.
2. Open the file draft.emms in a standard editor (Notepad++, emacs, etc)
3. Look at the structure of the file. It is organized into various blocks (details at the bottom):
-The first block (lines 6-9 in draft.emms) comprises the text sections of the experiment-scene. There are three text sections: Task, Hint and Description. You can replace the dummy text in the draft file with your own text.
-The second block (lines 12-27 in draft.emms) comprises the objects in the scene. Each object has a number of properties that you can modify by changing the parameter values. In the draft file there is only one rectangle that can be replaced with your own objects.
-The third block (lines 31-46 in draft.emms) comprises the light sources. Again, there are properties that you can change.
-The fourth block (lines 50-58 in draft.emms) comprises sensors with only a few properties.
-The fifth block (lines 62-78 in draft.emms) comprises markers that are visible in the scenes as red crosses or red lines but do nothing.
4. Fill the draft file with your own content. After finishing, simply copy the file using iTunes File sharing (for iOS devices) or into the folder "Android/data/com.algorizk.lightwavestudio" of the internal storage (for Android devices). When starting LightWave Studio, your own scene should appear on the "Choose experiment" screen. If it doesn't, you probably created a syntax error in your .emms-file (you can try loading the draft.emms file into the app for a quick test whether the upload works).
5. Have fun creating your own experiments!
If you manage to create a wave optics experiment that you think is worthwile for others to check out, just send your .emms-file to us and we will check it and upload it to our website if it's well done.
Details:
3.1 Text section:
Simply replace the dummy text with your own (lines 6-8 in draft.emms, compare screenshot below).

There are keys for bold font, colored font, normal font and line break. The keys are as follows:
\n (line breaks)
\021 (bold font)
\20 (back to normal font)
\004 (red font color)
\007 (white font color = default color)
3.2 Object section:
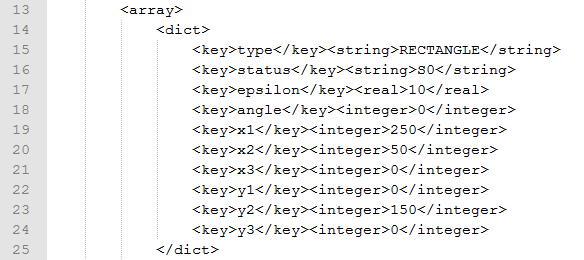
Insert new objects into your scene by copying and pasting the object-block in the draft file (lines 14-25 in draft.emms, compare screenshot below).
You can then change the object type and all of its parameters. Take care when changing the "status"-parameter: This one denotes when an object is visible. For "FIXED" it is not editable in the experiment and always visible (for TASK-mode and all SOLUTIONS). For "S0" it's only visible in SOLUTION 1, for "S2" it's only visible in SOLUTION 2 and for "S3" it's only visible in SOLUTION 3.
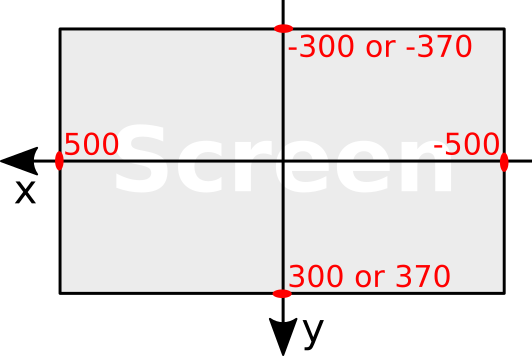
When changing the position and size of an object, be aware that the coordinate system is oriented and bounded as shown in the following picture.
3.3 Source section:
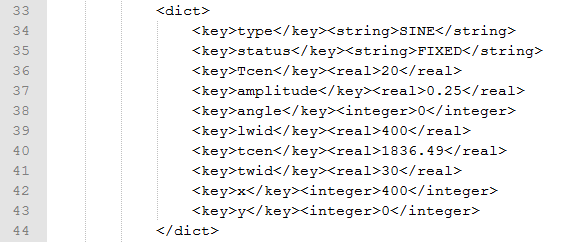
Insert new sources into your experiment-scene by copying and pasting the object-block in the draft file (lines 33-44 in draft.emms, compare screenshot below).
It is good to know that the spped of light is c=1 in the simulation. So, the wavelength of the emitted light equal to the Period: lambda=period.
3.4 Sensor section:
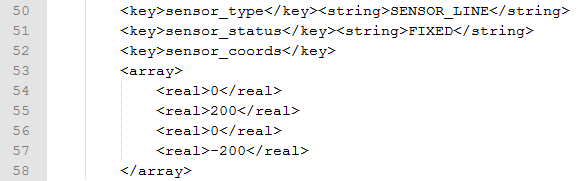
There are two types of sensors, line and point sensors. Again, insert new sensors into your scene by copying and pasting the whole (!) sensor-block in the draft file (lines 50-58 in draft.emms, compare screenshot below).
3.5 Marker section:
There are two types of markers, point markers (crosses) and line markers. Again, insert new sensors into your scene by copying and pasting the blocks for the point target coordinates or the segment target coordinates in the draft file (lines 64-67 and 71-76 in draft.emms).
